Dynamic plugins in C-Blosc2
Updated: 2023-08-03 Added a new example of a dynamic filter for Python. Also, we have improved the content so that it can work more as a tutorial on how to make dynamic plugins for Blosc2. Finally, there is support now for dynamic plugins on Windows and MacOS/ARM64. Enjoy!
The Blosc Development Team is excited to announce that the latest version of C-Blosc2 and Python-Blosc2 include a great new feature: the ability to dynamically load plugins, such as codecs and filters. This means that these codecs or filters will only be loaded at runtime when they are needed. These C libraries will be easily distributed inside Python wheels and be used from both C and Python code without problems. Keep reading for a gentle introduction to this new feature.
Creating a dynamically loaded filter
To learn how to create dynamic plugins, we'll use an already created example. Suppose you have a filter that you want Blosc2 to load dynamically only when it is used. In this case, you need to create a Python package to build a wheel and install it as a separate library. You can follow the structure used in blosc2_plugin_example to do this:
├── CMakeLists.txt
├── README.md
├── blosc2_plugin_name
│   └── __init__.py
├── examples
│   ├── array_roundtrip.py
│   ├── schunk_roundtrip.py
│   └── test_plugin.c
├── pyproject.toml
├── requirements-build.txt
├── setup.py
└── src
    ├── CMakeLists.txt
    ├── urfilters.c
    └── urfilters.h
Note that the project name has to be blosc2_ followed by the plugin name (plugin_example in this case). The corresponding functions will be defined in the src folder, in our case in urfilters.c, following the same format as functions for user-defined filters (see https://github.com/Blosc/c-blosc2/blob/main/plugins/README.md for more information). Here it is the sample code:
int blosc2_plugin_example_forward(const uint8_t* src, uint8_t* dest,
                                  int32_t size, uint8_t meta,
                                  blosc2_cparams *cparams, uint8_t id) {
  blosc2_schunk *schunk = cparams->schunk;

  for (int i = 0; i < size / schunk->typesize; ++i) {
    switch (schunk->typesize) {
      case 8:
        ((int64_t *) dest)[i] = ((int64_t *) src)[i] + 1;
        break;
      default:
        BLOSC_TRACE_ERROR("Item size %d not supported", schunk->typesize);
        return BLOSC2_ERROR_FAILURE;
    }
  }
  return BLOSC2_ERROR_SUCCESS;
}


int blosc2_plugin_example_backward(const uint8_t* src, uint8_t* dest, int32_t size,
                                   uint8_t meta, blosc2_dparams *dparams, uint8_t id) {
  blosc2_schunk *schunk = dparams->schunk;

  for (int i = 0; i < size / schunk->typesize; ++i) {
    switch (schunk->typesize) {
      case 8:
        ((int64_t *) dest)[i] = ((int64_t *) src)[i] - 1;
        break;
      default:
        BLOSC_TRACE_ERROR("Item size %d not supported", schunk->typesize);
        return BLOSC2_ERROR_FAILURE;
    }
  }
  return BLOSC2_ERROR_SUCCESS;
}
In addition to these functions, we need to create a filter_info (or codec_info or tune_info in each case) named info. This variable will contain the names of the forward and backward functions. In our case, we will have:
filter_info info = {"blosc2_plugin_example_forward", "blosc2_plugin_example_backward"};
To find the functions, the variable must always be named info. Furthermore, the symbols info and the functions forward and backward must be exported in order for Windows to find them. You can see all the details for doing that in the blosc2_plugin_example repository.
Creating and installing the wheel
Once the project is done, you can create a wheel and install it locally:
python setup.py bdist_wheel
pip install dist/*.whl
This wheel can be uploaded to PyPI so that anybody can use it. Once tested and stable enough, you can request the Blosc Team to register it globally. This way, an ID for the filter or codec will be booked so that the data will always be able to be encoded/decoded by the same code, ensuring portability.
Registering the plugin in C-Blosc2
After installation, and prior to use it, you must register it in C-Blosc2. This step is necessary only if the filter is not already registered globally by C-Blosc2, which is likely if you are testing it or you are not ready to share it with other users. To register it, follow the same process as registering a user-defined plugin, but leave the function pointers as NULL:
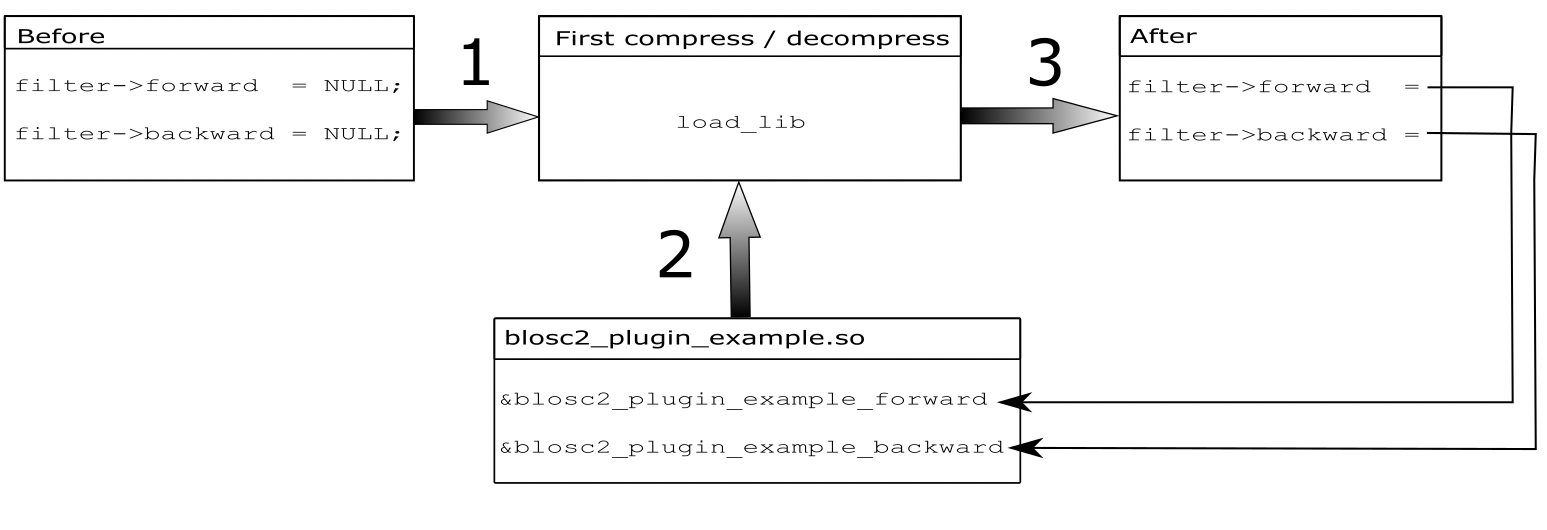
blosc2_filter plugin_example;
plugin_example.id = 250;
plugin_example.name = "plugin_example";
plugin_example.version = 1;
plugin_example.forward = NULL;
plugin_example.backward = NULL;
blosc2_register_filter(&plugin_example);
When the filter is used for the first time, C-Blosc2 will automatically fill in the function pointers.
Registering the plugin in Python-Blosc2
The same applies for Python-Blosc2. You can register the filter as follows:
import blosc2
blosc2.register_filter(250, None, None, "plugin_example")
Using the plugin in C-Blosc2
To use the plugin, simply set the filter ID in the filters pipeline, as you would do with user-defined filters:
blosc2_cparams cparams = BLOSC2_CPARAMS_DEFAULTS;
cparams.filters[4] = 250;
cparams.filters_meta[4] = 0;

blosc2_dparams dparams = BLOSC2_DPARAMS_DEFAULTS;

blosc2_schunk* schunk;

/* Create a super-chunk container */
cparams.typesize = sizeof(int32_t);
blosc2_storage storage = {.cparams=&cparams, .dparams=&dparams};
schunk = blosc2_schunk_new(&storage);
To see a full usage example, refer to https://github.com/Blosc/blosc2_plugin_example/blob/main/examples/test_plugin.c. Keep in mind that the executable using the plugin must be launched from the same virtual environment where the plugin wheel was installed. When compressing or decompressing, C-Blosc2 will dynamically load the library and call its functions automatically (as depicted below).
Once you are satisfied with your plugin, you may choose to request the Blosc Development Team to register it as a global plugin. The only difference (aside from its ID number) is that users won't need to register it locally anymore. Also, a dynamic plugin will not be loaded until it is explicitly requested by any compression or decompression function, saving resources.
Using the plugin in Python-Blosc2
As in C-Blosc2, just set the filter ID in the filters pipeline, as you would do with user-defined filters:
shape = [100, 100]
size = int(np.prod(shape))
nparray = np.arange(size, dtype=np.int32).reshape(shape)
blosc2_array = blosc2.asarray(nparray, cparams={"filters": [250]})
To see a full usage example, refer to https://github.com/Blosc/blosc2_plugin_example/blob/main/examples/array_roundtrip.py.
Conclusions
C-Blosc2's ability to support dynamically loaded plugins allows the library to grow in features without increasing the size and complexity of the library itself. For more information about user-defined plugins, refer to this blog entry.
We appreciate your interest in our project! If you find our work useful and valuable, we would be grateful if you could support us by making a donation. Your contribution will help us continue to develop and improve Blosc packages, making them more accessible and useful for everyone. Our team is committed to creating high-quality and efficient software, and your support will help us to achieve this goal.
Comments
Comments powered by Disqus